Showing posts with label nail polish. Show all posts

Monday, April 30, 2012

NOTW: Perfect Peach

Happy Monday Night!

If you all looked at my post yesterday about my Ulta purchase, you already have a sneak preview for the nails I am about to show you all.  If not, here's a link to yesterday's post, or you can just keep on reading.

Sunlight


I think this type of nail design is called color blocking, but it my version may be different because they sections are not really blocks.  But anyway, I was really excited about this.  Like I said yesterday, I am finally glad I found my perfect orange.  This is Tu-Lip Service by Ulta.  It's a glittery orange-peach that has a little bit of a gold hue to it in some lights and in the bottle.


Shade

For this notw, I have two coats of Tu-Lip Service "wedged"     between Seche Clear (basecoat) and Seche Vite (topcoat).  The color really is pretty opaque, but when the sunlight hits it plus the use of my camera, it does look like the smile line is showing a little on my index and pinky fingers.  But it's hardly noticeable in real life.


I think another really cool thing about this nail polish (well all of the Ulta minis) is that it is the perfect size.  I have always complained about OPI's minis and that they are extremely tiny.  But these cuties are 7ml.  They have the perfect brush as well.  I feel like it's one of the nail polish bottles that allows you to get all the nail color out, and minis are especially hard to do that with.  Not this one.  I mean, if Ulta sold all their polishes this size for like $1.50 or $2.00 my nail polish collection would probably have three times as many nail colors as it does now.

As much as I like the little bottle, this color really is pretty enough for a full bottle.  But until Ulta makes one, I guess it's just me and the little guy for now.

Oh, and lest I forget my accent nail.
I took step by step pictures on how I did it; however, this is already a really long post, and I am kinda tired and still have history work to do, so I will post a tutorial later on this week.

But if you still want more nail polish designs, just check out some of my other posts in the archive section on the right side of my blog.

Here are some more pictures of this week's mani:


Sunlight

Shade


Sunday, April 29, 2012

Ulta Skittle Nails

Hey Everyone,

It is Sunday!  Yesterday I got up really early in the morning to drive two hours to perform a three minute song for a state competition.  As tired as I was, I drove all the way back.  But when we got back in the city, my mother and I decided to stop at Oberweis to buy some ice cream.  So anyway, long story short, I decided to stop at Ulta.  I had $3.50 off coupon for a while now and decided to use it.

Here's what I bought:


This is a five pack mini nail polish called "In Bloom."  The colors are exactly what I have been wanting.  I cannot tell you how long I have been looking for a perfect orange.  These are the perfect colors for summer!

Four of the five colors are glitters and one is an opaque orangish-coral.  This colors are  (in left to right): Snap-Dragon Me Down, Voted Most Poppy-ulur, In a Daisy, Tu-lip Service, and Fleur-ever Yours).


All the glitters are pretty sheer, so for my skittles swatch, I decided to layer them over one coat of Opi's Alpine Snow.  I just have a tiny bottle of the white polish, so the white coating underneath the base color is not well done, but I didn't plan to leave this on all day.  Actually I have a new design on now.  So yeah, I apologize for the terrible nail job I did. 

Here is a sneak preview for the nail design I have on my nails now, and what I will be sharing with everyone tomorrow:


"Color Blocking"


Look for tomorrow's post for the full manicure!
Until then, <3

Thursday, April 26, 2012

Stirred NOT Shaken

So this is just a quick post to talk about actual nail polish.  I am taking a break from writing a 5 page history paper on the political development of Iran to tell you about this.  So it must really be important.

You know right before you paint your nails and you look at the nail polish bottle and it looks like the colors have separated?  For me it tends to happen with my light purples and blues where the darker hues float to the top, but every nail polish is different. 

Here's an example of a polish that I always have to shake two or three times before I can use it.  It's Orly's Snowcone, and not only does the polish separate really fast, but I spilled the bottle.  That's why it looks really gross on the outside.

Don't you just hate when the happens?

So anyway, what do you do to make the color come back to the original?  The easiest way would be to shake it.

I bet you all have heard this a thousand times, but DON'T SHAKE THE NAIL POLISH BOTTLE. It does actually make a difference.  When you shake the bottle, bubbles form.  Just like if you shook a bottle of water, you are going to produce bubbles.  Albeit the bubbles will not be as noticeable in the bottle, (especially when you paint your nails) but when your nails begin to dry, there will be tiny bubbles.

Sometimes a top coat, like Seche Vite, will take away the bubbles, but they will still look very unappealing.

So how can we prevent this from happening?

  1. Use a different nail polish
  2. Roll the bottle between your palms if the color is too separated
  3. Or, shake the bottle at least 15-20 minutes before you apply (I always shake around the time I use nail polish remover to take off last weeks manicure)
Trust me, you will see a difference.  However, you still might get bubbles if you paint your nails with a fan on high speed.  But, as long as your nail polish is "stirred" and not shaken, you nails should look as smooth as a freshly shaven calf =]

Wednesday, April 25, 2012

NOTW: Bright, Red, and Sparkly


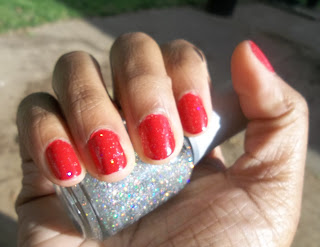
I am really excited about the polish on my nails for this week.  My last nails were Water Marble, a play of off Gradient, and Ombre nails.  So for this week, I just wanted something bright, sparkly, fun, and girly.   And this is what I came up with: 

Taken on a beautiful April afternoon

The base color is this jelly red by Bon Bon which my parents probably bought for me when I was like 7 (this just proves, nail polishes really don't go bad).  So I don't have a name for it.  But it basically is just your regular red, except I think more pigmented.  And of course I used Seche's base and top coats to start and finish off this nail look.

On top I added one coat of Orly-Shine on Crazy Diamond.  I love this nail effect.  It is so easy to apply.  You don't have to worry about applying the sparkles in a specific way, just paint it on there like a normal nail polish and it surely will look amazing.  


The first picture above was taken when the camera was focused, and that is about the only time you will not see the sparkles in this Orly nail polish not sparkling.  Even indoors, the sparkles will catch some light and will just glisten.  The picture directly above was taken out of focused, but is the best visual representation for how the sparkles look in real life.  Can't you just see how awesome that sparkle looks in the bottle?

I think the best thing about this nail polish was that is was free.  I had one of those Seventeen magazine coupons that allowed me to get a free Orly nail polish from Ulta, but only from a selected assortment.  However, when I went there, the Ulta didn't have the correct options.  So the lady there just gave me this one!  I guess some of the best things in life manicures are free.

Until next time <3

Friday, April 20, 2012

NOTW: Sponged Gold and Berry

Happy Friday.  I think this post managed to make it within three weeks of the last, so I'm getting better.  Lately it's been so busy with school that I really only painted my nails twice in the last two months.  So even if I wanted to post more often, I wouldn't have anything to talk about.

But on a higher note, I am going to be posting more regularly.  I have realized that when I don't have a pretty perfect nail polish on my nails, I begin to pick at it during class and then become distracted.  Yeah, sometimes I get distracted from staring at the pretty nail color a day after I paint them, but it's not as bad as literally picking the color from my nails.  So really look for some more frequent posts, I'm serious this time.

For today's Nails of the Week (that were worn three weeks ago), I have a sponged on nail design.  I started off with two coats of Ulta's Fushiamania.   I then took a makeup sponge and sponged on Orly's Luxe over top.  At first I was going to do sort of a fade going up the nail, but I decided to just sponge the gold on the entire nail.  I actually like my right better, but I took this pictures about 4 days after I painted them, and the right hand had a few chips.

However, the chips obviously weren't that bad since I continued to wear this polish for the rest of that week and the next.  I had two test coming up, a debate for English, two papers to write and a presentation for Physics.  My life is complicated...like everyone else's.


Sorry the picture is so dark.  It almost makes my hands look dead.  But I needed to hurry up and take a picture of my nails before any more chips happened and it wasn't very sunny outside at the time.  The homemade berry color is more vibrant and "poppy" in real life, and the gold glitter on top sparkles more in the sunlight.

SIDENOTE: I actually darkened Fushiamania with a good few pours of black nail polish because it looked too similar to China Glaze's Make an Entrance.  (Click here to see a NOTW of Make an Entrance)


I just cut a triangular piece from a round makeup sponge.

Apply the nail polish directly onto the corner of the
torn makeup sponge for best results.

Overall, this is a pretty fool-proof nail design.  If you are tired of the same plain nails, certainly give this a try.  All you need is a base color, a glitter nail polish, and a old makeup sponge.  I seriously got this one from my mother who bought it about 15 years ago, not even joking.

I promise promise promise that I will post more frequently.  I didn't have school today, so I might even post another nail of the week from last week, or maybe start on some of the "Other Tales" that my blog name suggests I will have.  Guess you'll just have to come back to see what the next post will be.  And yes, that just rhymed =]

Saturday, March 3, 2012

NOTW---Ombré Nails

Hey Everyone!


This is my first post with my new blog title: "Nails and Tales,"  And I thought I would start it off with some Ombre Nails of the Week.  I know this trend has been going around for a while.  It took a lot of convincing myself to try this look because I never am one to wear different color nail polish colors on my nails without some type of design.  But I am glad that I tried this because I am absolutely loving it.


The main color I used for this design is China Glaze-Make an Entrance (located on my ring finger) and then added drops of white and black to form the different hues on the rest of the fingers and thumb.  I only used one coat of color in between Seche Vite base and top coats.  

I kept this design on for one week, as I normally do.  But I easily could have worn this look for at least another three or four days because it did not chip at all.  If you all are thinking about trying the ombré look, hurry up fast before this fad runs out.

Monday, February 27, 2012

NOTW---Tribal Art

Update: I'm not sure why I forgot to upload these nails, I did them about a month ago.  But I still wanted to share them with you.  I have two more that I need to upload, so be on the lookout for those.


For this weeks "Nails of the Week" I have decided to go bigger than I ever have before.  I was a little puzzled as to what I should do with my nails this week.  Last week I did a bright pink with silver and black criss-cross lines over top with silver and black flowers on the middle fingers (sorry I don't have a picture).

So this week I was planning on doing just a plain design with maybe a shimmer polish. BUT, I just recently discovered pinterest.com and as I was searching through their nails section, I found this design:   

Tumblr_lhwnsfrjqr1qa87g7o1_500_large
http://weheartit.com/entry/7873474/via/ashleypola
As you can see, I modified the pointer and pinkie a lot, while I just changed a little on the thumb because that detail was just a little to detailed for me to handle.

Left Hand (I'm left handed so I think I did a pretty
good job with my right hand)

For this design I used Orly- Luxe, OPI- You Don't Know Jacques, and OPI-Arctic Snow, along with a black and white striper.  As difficult as this design may look, it was very easy if you just focus one detail at a time.  I hope some of you will try this design in the future.  If you do, please comment below and let me know how it went.

Until next time <3


Monday, January 16, 2012

Extra NOTW!

As I was flipping through my photos on my iPod, I stumbled across this nail art design from my first week of school way back in August. I really liked this design but I guess I just didn't bother posting the final result.

I just did the diagonal stripes on the thumb and ring fingers, leaving the other three fingers a solid coraly-orange colors. For this design I used Finger Paints-Drawn to this Shade and silver and white stripers. The color is more coral pink, I have a good photo of just a plain manicure on an earlier post "Nails of the Week-Coral!!!"

Sunday, July 31, 2011

Nails of the Week! (Coral)

Alright, so I am really excited about this weeks nails.  I hadn't worn this color for a while only because I was trying out some of the newer polishes I had purchased during the spring.  However, when presented with the question of what nail polish to go with this week, I dug this out of the bottom of my nail case and slapped it on my nails (well, precisely painted it).  I purchased this polish at Sally's a little over a year ago, and it still looks awesome.  This polish is Drawn to this Shade by Finger Paints!
Drawn to this Shade
by Finger Paints

I'm not sure why the Finger Paints brand isn't as popular as China Glaze or even Orly because I believe that the nail polish is just as good, if not better than CG.  The brush size is medium, which is nice, but I really like the formula consistency.  To me, CG's nail polishes are a little watery and are very sheer.  But with this nail polish, it wasn't too watery and came out to be opaque in only two coats.

If there was one thing I would complain about this specific nail color, it would be the fact that the color doesn't always appear the same way in different lighting.  I know this is true for most nail polish colors, but especially with corals.  When in the wrong lighting, my nails look bright orange and does not compliment my skin tones at all.  With sunlight in the daytime, the color is a very pretty color. Luckily I was finally able to capture the real color of my nail polish on camera. It took me a few tries, though.

Tuesday, July 26, 2011

Nails of the Week!

For nails this week, I decided to go with another polish with a glossy finish as opposed to an opaque solid color like last week.  (For that post click here!)  This is Chantilly Peach by Orly.  The Orly brand is really good, I have four polishes from them and would not mind getting another.  The brush is the perfect size, not too fat and not too skinny, and the rubber top makes the polish easy to open.  As far as the color of this nail polish goes, I was a little concerned about it because at Sally's, where I bought it, a sheer subtle color wasn't really what I was looking for.  But I thought the color was really pretty and elegant looking so I went ahead and bought it.

It really isn't that sheer.  With one coat you can see the smile line on your
nails, but two coats (which is what I did) the color is really opaque and matches the color in the bottle perfectly.  Unfortunately, I got those ugly tiny bubbles/bumps on my nails either because 1) I shook the bottle too much, you really should roll it in between your palms or
2) the ceiling fan caused the polish to dry while I was still applying the coat.

Either way, this nail polish is really pretty.  It's one of those polishes that you can wear in the summer or the fall that goes with practically any outfit.  It not too stand-out of a color, which in my case is beneficial since I have those ugly bubbles =]

Wednesday, July 20, 2011

NAILS!!! NAILS!!! NAILS!!!

I love nail polish!  Something I should have put on my Summer To-Do list is paint my nails because I have done this every week.  Why?  Let's stretch out our wings and fly back to last December.  New Years Eve actually, I made a resolution, I always do.  But this one I actually followed through with: Paint my nails every week a different color.

At first this was hard to do, I had a good amount of nail polish, but they were all winter colors (colors, lookout for a blog on that too), and when April rolls around, what am I to do?  So I went shopping.  I got a whole bunch of colors and have been painting my nails ever since.


So back to what this post was originally going to be about, I'm going to post a picture of my nails every week so that if you like them, you can get the nail color.  And if not, it's still a good way for me to keep track.  That's another thing about me, I always like to see the positive in situations.  This is not saying that I'm those people that are too happy and annoy everybody like that lady on that episode of Grey's Anatomy who was way too happy and her husband was going crazy about it.

Yes? No? Do you know what I'm talking about?  It doesn't really matter, all I'm trying to say is that I look at the good and bad parts of situations, but then eventually only focus on the good.  This post is starting to turn into a rant, and is causing me to waste time.  Success, I think yes (that rhymed) =]

Here are my nails from last week!
Ulta: Scene Steel-er
 

And this week:
China Glaze: Make An Entrance
more pinkish in real life
taken by iPod


Stay tuned for more pics next week!